Looking for a particular post or topic? Search here!

Where My Readers Are From

Flag Counter

Who's Reading HFM Life

Showing posts with label household tips. Show all posts

Saturday, February 3, 2024

Mr DIY Replacement Fan Blade

My Panasonic stand fan gave out rattling sounds a few days ago. Initially, I thought that Maria didn't screw the fan blade securely after cleaning it. So I tightened it but after a few minutes, I got a shock when a piece of the middle section of the fan blade dropped out.  Seconds later, another broken piece flew out!  

A tiny bit of my heart dropped too.  Any breakage of appliances or items in the house means money is about to fly out! We just bought a new washing machine less than two months ago. The ceiling fan in my bedroom needs to be replaced too.

I quickly Whatsapped the customer service staff of Tan Boon Meng electrical shop to ask if they carry the replacement fan blade but I was too early and the person in charge wasn't in the office yet. 

Later, I told hubby and he asked me to look for a replacement fan blade at Mr DIY.  Fortunately, there's stock for the 16-inch fan blade and after paying for it, I prayed that it would fit my Panasonic fan.

Back home, I quickly asked Maria to try putting the new fan blade in.  Maria spent 5 minutes trying to screw the blade in but it just wouldn't move any deeper. Just as I was about to bring the fan blade back to Mr DIY to get a refund, I tried one last time and pushed the blade deeper, and voila, it clicked!  💪🎉

The replacement fan blade from Mr DIY only costs about RM7 (can't really recall the actual price). The quality of the Mr DIY fan blade feels almost the same as the Panasonic one. It's made of plastic, which feels kind of fragile - the type that once you dropped it, it would crack.  So I advised Maria to be very careful when cleaning the fan, i.e. do not drop it on the floor or screw it too tightly, or it would break again.


Broken fan blade.


16" replacement fan blade from Mr DIY that costs less than RM10.  So glad that I don't have to get a new stand fan, as this would set us back at least RM250.


Wednesday, January 31, 2024

Can You Eat Avocados With Black Spots, Brown Spots and Dark Streaks?

Avocados are renowned for their creamy texture, rich nutty flavor, and jam-packed with health benefits. However, discovering a blackened interior with black veins in your avocado can be a cause for concern. 

Avocados are pretty costly and discovering an imperfect interior with brown spots, black spots, and dark stringy flesh can be very disheartening. Do you throw the avocado away? Or do you cut off the dark parts and eat the green parts?  If you’re an avocado lover, just like my family and me, you’ve most likely been faced with this predicament umpteen times.

Avocado with brown flesh


Natural Ripening Process 

Avocados undergo a natural ripening process, during which the flesh transforms from firm and green to soft and creamy. As part of this process, the color of the avocado can change to a darker shade, sometimes appearing almost black. This change is typically harmless and often indicates that the fruit is perfectly ripe.


Enzymatic Browning

The blackening of avocado flesh can also result from enzymatic browning, a natural chemical reaction that occurs when the fruit is exposed to oxygen. While this process may alter the color, the avocado remains safe to eat. You can simply scrape off the discolored portion to reveal the unaffected, flavorful flesh beneath.


Veining in Avocado 

Veining or string-like structures in an avocado may be a result of its variety or the presence of undigested fibers. This occurrence is not uncommon and is generally considered safe for consumption. The veins themselves are harmless and can be consumed without adverse effects.


Dark streaks within avocado flesh


Signs of Spoilage 

While discoloration alone does not necessarily indicate spoilage, it's crucial to be aware of additional signs. If the avocado emits a foul odor, has a sour taste, or displays mold growth, it may be an indication of spoilage and should be discarded.

Don’t try to salvage any part of a sour-smelling or moldy avocado, as it has the potential to make you sick.


Health Considerations 

Consuming black avocado flesh, even with veins, is generally safe for most individuals. However, those with latex allergies or sensitivity to certain proteins found in avocados may experience allergic reactions. If you have known allergies or concerns, it's advisable to consult with a healthcare professional before consuming avocados.


Conclusion

In conclusion, the blackening of avocado flesh, accompanied by veins, is often a result of the natural ripening process and enzymatic browning. These occurrences are generally harmless and do not pose health risks. By understanding the reasons behind these color changes, you can confidently enjoy avocados while ensuring their quality and safety. Remember to rely on additional signs of spoilage, such as odor or mold, to determine the overall condition of the fruit. 

Through smell, taste, touch, and visual inspection, you can determine whether an avocado has spoiled, and whether to eat or discard it.


Wednesday, December 28, 2022

How To Clean A Burnt Iron (Removing Burnt Cloth From Iron)

Last week Sherilyn burnt the new black pants that she bought from Shein whilst ironing it.  She was in a hurry to go out with her friends and had spent almost the entire day baking cakes.  

After spending the whole morning and afternoon baking two flour-free orange cakes (one for her grandparents in Ipoh and one for her grandaunt) and two chocolate cakes (one for her friend's birthday and another one for her grandaunt), she hurriedly ironed her pants for her girls' night with her former classmates.  Minutes later, she ran out of the room to show me her burnt pants with a big chunk of cloth that was stuck to the iron! She was totally devastated that her favorite pants couldn't be saved, not even after chopping off the long parts to make it into a pair of shorts. The hole is on the pocket part.

The cakes that Sherilyn baked. 

I think I know what she did that caused the big boo-boo. She of course said she did everything right and yet the pants got burnt. Oh well.  We've all been there and done that too.

Anyway...

The mil was fuming as the iron is an expensive one gifted to her by her eldest daughter who bought it from Hong Kong.  MIL told Sherilyn to clean up the iron or buy her another similar iron 😂

The damage done to the iron looked really bad. The fabric from the black pants melted and was glued to the hot iron.  The black pants was a total loss and no way could it be saved as the big hole was right smack in front.

As Sherilyn was already running late, she didn't have time to Google ways to clean a burnt iron.  She was busy dolling up herself for her dinner with her friends.  Alycia, begrudgingly volunteered to help as she wanted to use the iron.   She spent almost an hour googling ways (while cussing) and tried half a dozen of methods but none worked until she tried VINEGAR + BAKING SODA!  And voila, it worked like a charm.

The piece of burnt fabric came off from the iron's soleplate in one single piece, like a piece of thin crispy seaweed.  Cass, Alycia, and I were awed to see the burnt fabric peel off like magic!


Method

Make a paste with equal parts vinegar and baking soda, dip a clean microfiber cloth into the paste, then rub it in small circles over the soleplate.

She used rice vinegar as we'd run out of synthetic vinegar.  Be sure to use a microfiber cloth.


On another note, Sherilyn also used rice vinegar to remove a big patch of matcha (green) stains off her white pants just a few days ago when she spilled hot matcha on it.  This careless girl damaged two of her favorite pants in less than two weeks.   The green stains came off almost completely from her white denim pants after the pants was soaked in rice vinegar and baking soda for three days.


The burnt piece of fabric peeled off from the iron's soleplate after rubbing the iron with vinegar and baking soda with a microfiber cloth.


After the burnt fabric is peeled off, continue using a microfiber cloth and filtered water to scrub off the stains off the soleplate.  

The iron is now 99.9% clean like before!

Friday, July 9, 2021

Using Hand Sanitizer To Kill Ants

After trying a dozen of methods to kill ants by using gentle ingredients but with little success and feeling really frustrated with the infestation of tiny brown ants in my kitchen and surrounding Cass' desk (this brat eats at her desk!), I tried another method just out of curiosity to see if it worked.  I wiped our kitchen counter and floors with hand sanitizer and VOILA, I saw dead ants everywhere! 

All I did was pumped some hand sanitizer with sodium hydroxide and wiped the sides of the kitchen counter, the dining area floor and under Cass' desk and that's it. The ants just stopped coming and I see dead ones here and there. 

What prompted me to use hand sanitizer was our leftover stash of hand sanitizer which we spent much effort and money to hoard during the first wave of Covid-19 early last year. At that time, face masks and hand sanitizers were flying off the shelves of all the pharmacies around the Klang Valley. Whenever we saw any being replenished, we went berserk and grabbed bottles of hand sanitizers and face masks though some unscrupulous sellers jacked up the price.  Now that face masks and hand sanitizers are a glut everywhere and they are even given as free gifts, we now have too many bottles of hand sanitizers and some are nearing their expiration dates.  Thus, I use the hand sanitizer to do general cleaning around the house and experimented it with ants. And it worked!

So glad I found another accidental discovery! 😂😂😂

I am guessing that sodium hydroxide (also called lye) is the key ingredient that kills ants. 

If you have hand sanitizer that contains alcohol, this can also be used to kill ants.  However, this is quite an expensive method to try with. You could use your near expiration date hand sanitizers or simply use cheap alcohol and wipe it on the paths that ants move about to kill ants safely.

Good luck in trying and do let me know if any of the methods that I mentioned works!


Saturday, July 3, 2021

Easy Way To Prevent Coffee Powder From Hardening In The Bottle

I discovered by chance that by placing a wooden stick or wooden spoon inside my jar of coffee powder, this will prevent the coffee powder from hardening.  It was a pure fluke discovery!

I have always hated scraping hardened coffee off the glass bottle each time the coffee powder reaches the bottom of the jar.  Recently, I noticed that each time I put a recycled ice-cream stick inside the coffee powder bottle, the coffee powder remains fresh and loose until the last granule. After finishing a few bottles, I realized that it must be the wooden stick absorbing moisture from the coffee powder. And that's the reason why my coffee powder stays fresh and loose.  I've tried placing a stainless steel spoon in the bottle and the coffee powder hardened even faster.  It must be the compounds in coffee that reacted oddly with the metal spoon.


Hardly any hardened coffee powder at the bottom of the bottle.  The coffee granules stayed fresh and loose till the last bit.  

If you've always struggled with scraping and hitting your bottle to get the dang hardened coffee powder out, try the wooden spoon/stick method and see if it works!


Thursday, April 25, 2019

What's Causing Your Electricity Bill To Skyrocket?

Our electricity bills cost us the earth, every single month, with figures ranging from RM450 to RM500 every month, for the past few years. Shocking right? Considering we only stay in a 1,500 sq feet condo and there are only the 6 of us. I still don't understand how we can utilize so much of electricity every month. Air conditioner is only turned on for 2-3 hours in two rooms and for my room, it runs for 8-9 hours every night. That seems a lot but I have friends and relatives who literally turn on their air conditioner 24/7 and yet their bills don't exceed RM200 a month. They even leave the air cond turned on when they go out so that when they return and step into their house, it's cool and nice. Nice right? Wish I could do this too!  I don't even use the clothes dryer as this will jack up the amount further. So our clothes dryer is a white elephant sitting atop our washer since last year.

We boil water on the stove as well as use a tiny 500ml Russel Hobbs electric kettle once a day in the morning to make coffee and tea. Electric oven is only used occasionally. Ironing is done once every 2 days, for half an hour or shorter. We have two refrigerators and an electric airport flask. I was told by an electrician that the culprits that suck up hell a lot of power are anything that generates heat - iron, water heater, electric kettle, oven and electric airport flask, and of course the air conditioner.

For the longest time, I've been contemplating if I should get rid of the electric airport flask as we don't really need it anymore.  We bought it yonks ago when the girls were babies and replaced the airport flask with a new one last year.  Last month, the mil and I finally agreed to give the electric airport flask to our part-time helper as she's going to have a baby soon.  After a month, I saw magic on the electric bill!

The figures on the bill went down by a starking RM118! I can't believe that the electric airport flask could eat up so much power and money!  But I'll have to monitor our electric bill for the next couple of months to see if the figures have consistently remained at below RM400 before I can put the blame on the electric airport flask.

Once we had an industrial fridge in our house and our electric bill was so high that we discarded the fridge after a year or so. Right after the industrial fridge was removed, our electric bill took a dive and we were so relieved!


A huge drop in the bill from RM465.80 to RM347 in just a month!

Is your house electricity bill on the high side? If it is, you should go around your house to find the culprit, discard the item if it's not very useful to you and you'll be happily saying good riddance when you receive your next electricity bill!


Saturday, December 8, 2018

Simple Kitchen Hacks To Make Life Easier

I hate touching raw meat. I loathe the sight and odor of raw meat. I hate slicing / chopping them and would never ever chop a whole raw (or even cooked) chicken. But there's something about raw meat that I find kind of therapeutic  and it's when  I cut icy cold semi-thawed meat. 😀😆

What's magical to me about semi-thawed meat is that when I sink a sharp kitchen knife into the half icy meat, the sound of metal cutting into the meat creates the feeling and sound similar to that when I bite into an ice-lolly.  I know it's crazy, right? But semi-thawed frozen meat makes handling raw meat all peachy again for me. In my world 😄

Thus, if I have to cube or slice raw meat, I will only do it when it's half thawed. The sound and sensation of the knife cutting into the half thawed icy meat is pretty therapeutic to me. But this job turns skanky again when the meat is at room temperature and feels soft, bloody, wet, flimsy and almost disintegrating when you handle it. Yucky!

So I always freeze raw meat, or half freeze it before handling it.

Plus cutting semi-thawed meat gives you precision. When the meat is firm in a block, slicing and cubing is made so much easier, and it produces standardized size and shape of meat.


Another kitchen hack that makes my life so much easier is pre-peeled garlic.  Pre-peeled garlic sold in supermarkets are not very costly and it can save so much of my time peeling them. I only buy them when the mil is away and I have to take over the kitchen.


After peeling garlic, the next tedious and stinky job is chopping them. Thankfully I have a mini cutter to help me do my job.  This mini cutter does not require any battery or electric to operate it.  All you have to do is pull a string attached to the cutter several times and voila, you'll get perfectly minced garlic in just seconds. Plus, I find it therapeutic pulling the string HA HA HA!


Speedy Chopper - Portable Vegetable, Onion and Garlic Chopper


This vegetable cutter / chopper is very affordable and costs no more than RM20 at Lazada.

What are your kitchen hacks to make your life easier? Do share please!


Wednesday, October 18, 2017

Fire Retardant Set

At the recent Mid Autumn Festival carnival held at our neighborhood, there was a booth selling fire retardant products.  What an opportune timing for the booth to be there! Just the day before, someone almost burnt the house down when she did not turn off the fire on the stove and left the fire flickering at the stove overnight for 7 frigging hours.  The water in the wok had obviously evaporated and thank God, the wooden steaming rack inside the wok did not catch fire from the overheated wok.  God has always been protecting us.

Chris, thanks for giving me the idea of installing a battery-operated smoke detector. When I saw the smoke detector at the booth, I couldn't be happier. I had read your comment in my blog in the morning and that same evening, I saw the smoke detector for sale at the carnival.

I bought the 3-in-1 set which consists of a fire extinguisher, smoke detector and fire blanket.  The set is sold at a promotional price of RM170.

Now there is peace of mind at home.

Note to self: when I get back to KL, remember to place the battery into the smoke detector to activate it!


If you haven't already gotten a fire retardant set for your home, it's time you get a set now. 

Wednesday, November 5, 2014

How I Almost Burnt The Kitchen Down!

And so this is the story of how I almost burnt down my kitchen on Monday morning.  What perfect way to start off my new week *roll eyes*!

The drama queen had promised me that she would get up 10 minutes earlier to heat up some pizzas to bring to school.  We had some leftover pizzas from Itallianies from our Sunday dinner.

As I had expected it, the drama queen was moving too slowly and still in a zombified state that Monday morning.  So I helped her to reheat the pizza in the toaster oven.   While the pizza was in the toaster, I went about to do other chores.

About 10 minutes later when I opened the toaster door, fire was spilling out. I was shocked!!  There were BIG FLAMES!!  My instant reflex action was to blow off the fire!  And I jumped and blew, jumped and blew like a delirious woman, while screaming out FIRE to the drama queen.  I asked her to wake her daddy up.  After a few blow jobs which obviously did not put out the fire, I quickly scooped out 2 cups of water from a pail that is in the kitchen and splashed it into hungry flames.   Thank GOD the fire was quickly tamed and then it died off, PHEW!

And guess what the drama queen's first few words were after the fire?  "So I guess I have to bring the bread and seaweed to school after all, huh?"

I had already packed bread and seaweed for her but the drama queen wanted something more fancy for recess and promised that she would reheat the pizza herself.  And so, she still had to bring her bread to school after all the trouble that I had to go through, ha!


I quickly cleaned up the kitchen and got the drama queen to help to clean up too.  What a way to start off my Monday morning!

And the moral of the story is:
Never ever ever use grease-proof paper in the toaster oven.  I think what  ignited the fire was that the piece of grease-proof paper was too big and part of the paper touched the sides of the inner toaster oven.   I had hurriedly tore off a piece of grease-proof paper that morning to line the toaster tray.

So peeps, learn from my mistake.  Use only aluminum foil for your toaster oven and if you only have grease-proof paper at home, do tear off a piece that is just fitting the toaster tray. Make sure the sides of the paper do not touch the sides of the inner toaster oven that is burning hot.

And check your toaster closely. Do NOT ever leave it turned on while you attend to other chores and forget all about it. 


Sunday, August 17, 2014

Removing Fishy Odor From Oven

These days, we hardly fry our fish as we find it time-consuming and messy with  the oil splatters.

Instead, we grill our fish using the oven and it is way healthier, as very little or no oil is used.

To remove the aftermath of fishy odor from the oven, we put fresh orange or lemon peel in the oven while it is still hot - the moment the fish is cooked and removed from the oven.   You can turn off the heat and close the oven door with the orange or lemon peel inside.

After a few hours, the oven will smell zesty and refreshing.  I then use some wet wipes (I rinse the clean wet wipes under tap water to wash away any chemical in the wet wipes) to wipe away the grease inside the oven and let it dry with the oven door opened. 


So the next time you eat an orange or make a glass of lemonade, don't bin the rind.  Save the orange and lemon rind to freshen up your oven after use.  It does not cost you a sen and your oven smells great after use. This way, you don't have to use chemical-laden detergent to clean your oven.  But make sure that you use fresh orange and lemon rinds and not dried ones aged a day or two ya.  Fresh rinds emit a fresher zesty smell :)

Oh yes, I love to use orange and lemon rinds to wash greasy dishes.  The dishes smell great and I only have to squirt a drop or two of dishwashing liquid to form some foam to wash up.


Wednesday, March 5, 2014

When You Washed Your Dark Colored Clothes With Tissue Paper!

The culprit left tissue papers in her pocket again! Grrrrrr!!! As usual, I am always in a rush to complete my laundry chores, so that I can proceed to the next chore. After sorting out the dirty laundry and slotting them into washing nets, in they go into the washing machine. Hardly do I check the pockets. I had told them umpteen times that tissue papers washed with clothes in the washer is a major disaster and that they should never ever conveniently leave tissue papers in their pockets.

But habits die hard. Someone left her brain in the drain and thus left the tissue paper in her pocket! So die la. My load of clothes, which had hubster's black shirts and black pants kena badly! Boy was I fuming mad! Happened when I was rushing to bring Alycia and Sherilyn down to the lobby to wait for the transporter early in the morning. And I had no time to fix the problem. All the clothes in the washer were stained with bits of tissue papers. The washer tub and the gutter were stuck with tissue papers everywhere. Everyone said "NOT ME!!" Gawd, I was so irate I could explode! When Cass came back from school that day, I assigned her to help me stick the disintegrated bits of tissue papers off the clothes with celo tape. She was excited and very earnest to help ha ha!


little helper 1 


  little helper 2

 An hour later, all the black clothes were salvaged!  Told you she's a very  good baby.

Beside using celo tape to painfully stick the tissue papers off the clothes, what method do you use to salvage your tissue-stained clothes?

Wednesday, August 14, 2013

Cleaning Pillows, Mattresses and Bedding

The other day, one of my blog friends wrote in her blog that she washes her pillows in the washing machine each time she changes the pillowcases. I love the idea of washing my pillows to keep the pillows clean and free from dust mites, head lice and other bugs which are invisible to our naked eyes, which could be nesting and multiplying comfortably deep inside our pillows. I would do the same too if I live in a house with a garden or patio so that I can expose the pillows to the sun.

Living in a condo, we do not have the benefit of exposing our laundry directly to the sun, uncovered. We only get to hang our laundry at the balcony with limited exposure to the sun. Half of our laundry are hung indoors, under the fan.  Living in a condo with such limited space in the kitchen, we cannot even squeeze in a clothes dryer or a dishwasher as our extra space has been taken up by another refrigerator. Yes, we have 2 refrigerators  and built-in cabinets in the kitchen, occupying most of the space..

What I do is that I will sun our pillows and bolsters at least once a week. For bedsheets, pillowcases, bolster cases and blankets, I wash them every week. I also spray our mattresses with Sol-U-Guard disinfectant from Melaleuca to kill any germs and Sol-U-Mel (also from Melaleuca) to kill any dust mites and bed bugs.

That is the best I can do to avoid triggering the allergy button in my kids and I.  We have very sensitive noses and that is the reason why I am such a clean freak.


This is Sol-U-Guard disinfectant from Melaleuca. It kills mozzies, insects and cockroaches very effectively and safely as well.  It's definitely a life-safer for Katsaridaphobians like yours truly :P


Besides killing dust mites, Sol-U-Mel can also remove odors, stains and cleans the air.    Melaleuca products are safe and contain no harsh chemicals and toxic fumes. The main ingredients in their products is tea tree oil aka Melaleuca oil.  Just buzz me if you want to get these products from Melaleuca and I can help you get them at member's price.


How do you clean your pillows?

And how often do you change your bedding sheets?

Do you disinfectant and clean your mattress as well?

Thursday, June 27, 2013

Floor Cleaning Gadgets For A Clean Freak Mommy

Of all the brooms that I have tried, I must say that I LOVE the roller type with sticky papers the BEST (picture below)!  I do not have to use dust pan, I do not need to turn off the fan when I sweep, I do not need to wash the broom and dust pan after the dirty job is done and I do not need to keep chasing flying hair and dust when I am sweeping the floor!  And it is darn therapeutic to see those hair and dust get stuck to the sticker... confessions of a health and clean freak mummy muahahahaha!!  

Most of all, after the dirty job is done, I can just peel off the sticker and dump it. My girls find it therapeutic too, to keep rolling the floor and seeing dirt stuck  to the sticky paper.

I have an array of brooms in my house so that the girls and I can do the moping together.  Aly and Sher will be sweeping and moping the room floor and I will be cleaning the living room. Cass will help to roll the floor with stickers haha!    I like the roller broom with sticker  (the one in front, on the right) and the Kao Magic Mop (in front, on the left) the most. The cheaper version of Magic Mop (the one behind the blue Swash mop) is only RM5 and I bought it from 100 Yen Shop. We do not like it as the stick always dislodges from the mop holder and it is very difficult to fix it back.  The Kao magic mop costs nearly RM40 each.

The MIL bought the roller broom and the refill sticky papers from Hong Kong.  I have seen similar ones selling at 100 Yen Shop and Daiso here but I am not sure on the quality and how effective the cheaper versions are.

The blue mop called 'Swash' is also pretty good. I mop the floor with it after sweeping the floor with the roller sticker broom. The cloth for the 'Swash' broom can then be put into the washing machine to wash after use. The Swash broom is also over RM35 each.

I am not a vacuum cleaner person for I do not like lugging, pulling and pushing it around during use and absolutely hate cleaning the bag and machine after use. So I have resorted to these gadgets with disposable papers and washable cloth so that my dirty job gets done in a faster and breezier way and my sensitive hands are free from wringing and washing ;)


Everyone just loves to stroll and roll with this rolling sweeper! :)

Sunday, July 15, 2012

Impending Water Rationing In Klang Valley!

The most dreaded news by me finally made headlines in the newspapers today. For those of you who had gone through the 3 months of hardcore water rationing in 1998, you will know what I mean. But there is still a glimmer of hope that in the event of a confirmed water rationing exercise to be carried out, it will only be for several hours in a day instead of a cut every other day. Living in a condo where space is limited, it will be a challenge trying to fit the huge containers of water into the bathroom and kitchen. How many containers can we place inside our unit?  We need at least 2-3 huge containers of water to bathe and can only limit our bath time to once a day instead of the 2-3 luxurious showers a day during this hot and humid season. On my part, I have started to instil in my 3 girls the importance of not wasting water and the terrible inconvenience should a water rationing happen. My daughters have a tendency to let the water run from the tap whilst brushing teeth, despite umpteen reminders from me not to and taking their own sweet time having a long shower in the bathroom.

 I have also started to cut down usage of water and to recycle water in our household through:

1) Always have a small pail / basin in our sink to collect 'not so dirty' water after we wash our hands and rinse cups, plates and cutlery with the clean water from the tap. The recycled water will be transferred to another bigger pail in the bathroom, to be used for flushing the toilets and washing the bathrooms.

2) Filtered dirty water flowed out from the second outlet of our Panasonic Alkaline Water Purifier is now stored in a pail, for washing dishes and flushing toilets. In the past, the filtered dirty water will just flow onto the sink and into the drains.

3) Place a small pail inside the shower area. I have taught my girls to put the pail next to them and to rinse their body and hair as close as possible to the pail, so that the shower water can be collected in the pail. The recycled water from the pail can be used to flush the toilet.

4) Instead of a 1.5-hour washing machine cycle, I have since 2 weeks ago changed the mode to a 30-minute cycle, so that lesser water is used and electricity can be saved too.

5) No more washing of the balcony until there is no more water rationing. We just have to bear with the dust and dirt. We can always sweep instead of wash. Just have to close 2 eyes to dirt and imagine we are living in the 'kampung' !

6) Instead of flushing the toilet after every pee, I make my 3 girls pee one after another, followed by me and then I dump the pail of recycled water into the throne! Half a pail of water for 4 pees LOL!! Pressing on the flush button is now only reserved for big business!

7) Cut down on rinsing the cup with water before each use. How dirty can the cup be right?

8) In the event of a water rationing, I will have to resort to using disposable paper plates for meals. I know that this is not environmental friendly but heck, when there is not a trickle of water from the tap, you need to find alternatives and measures that will not add more stress to your bag of stress. And this is only temporary until God decides to let the skies shower.

9) I can only exercise on the days when there is water flowing from the tap. There will be no luxury to bathe twice a day on the days when the taps are dry. So I can only take a shower at night, just before bed. Again, think kampung-style living! LOL!

10) Use wet wipes to replace water for cleaning.


Please add to my list of measures to cut down on water usage if you have any good ones. It will be good for everyone who reads this post.


Pray tell that the water rationing exercise will be cancelled and that some better alternatives for the Rakyat will be in place by the government. Water is a necessity and cutting its supply will cause severe inconvenience to families with kids.


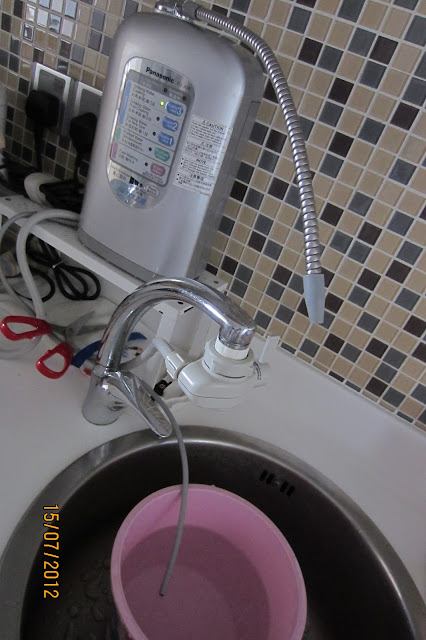
 Filtered dirty water from the water purifier second outlet is now collected in a small pail, the water of which will be used to flush toilets.


Thursday, April 19, 2012

Self-Watering Plant Pot From Ikea!

Have you ever had a major heartache upon return from a week-long holiday when you discovered that your once lively plants transformed into some severely dehydrated and shriveled shrubs that could not be revived? That is exactly what happened to the mil. Years ago, she went on an overseas holiday and when she returned, found that her favourite bonsai plant was in a severely dehydrated state. We all got some severe wigging from her for forgetting to water her plants. If you are facing problems with finding some reliable neighbors or friends to help you water your plants while you are away for a few days from your home, this self-watering plant pot from Ikea is the answer to your woes!

The self-watering insert keeps the soil moist.. The inner pot has 3 different colours; you can vary the colour that shows through the hole on the outer pot.
At only RM45 each, this innovative self-watering pot will help your beloved plants to thrive when you are away from your home for a few days. Perfect for forgetful and very busy peeps too. And perfect gift for your mom too for Mother's Day which falls on Sunday, 13 May this year :)

Friday, July 15, 2011

Tesco brand food stuff

I am all for buying store-brand products as they are way cheaper than more popular old brands. I love sanitary items from Tesco and Guardian, antiseptic liquid from Guardian, Tesco brand diapers, Tesco brand wet wipes and baby oil and a wide range of Tesco brand food products. Though the price is a fraction of other 'branded' food stuff, the quality is not compromised. Many of the Tesco brand food items are made in overseas countries, like mayo which is made in Belgium, digestive biscuits made in England, among others. As long as the product is not made in China, Taiwan and Japan, I am fine. I really do like Tesco brand food stuff a lot.

Tesco brand mayo - made with free range eggs and made in Belgium. It costs a few Ringgit cheaper than other brands. Taste wise - it's good.


Tesco brand tuna fish. This cost almost a Ringgit cheaper than other brands like Ayam Brand.


I hope some senior Management staff from Tesco reads this post and reward me with a free shopping spree at Tesco :D

Tuesday, June 22, 2010

How Do You Wash Your Kitchen Towels?

This is how my mil prefers the kitchen towels and any cloth used to wipe our bowls, plates, etc to be washed:


She boils them in a pot of soap water with bleach to kill all the germs 100%!

I don't think I will have the time to do this when my helper leaves soon. I'll just dump everything into the washing machine haha!

How do you wash your kitchen towels?

Tuesday, February 2, 2010

How To Remove Celo Tape Glue From Surfaces

Rascal #2 loves to play with the double-sided tapes that I keep in my drawer. She sticks them everywhere. The other day, a few pages of her book had come off. She could not find any celo tape, so she fished out the double-sided tape and taped them everywhere on her book... and left traces of the tape on our marble dining table.


My maid and I tried to wipe off the tape on the table, but it just didn't budge. It stuck to the table like glue.


When my mum saw the glue on the table, she dabbed some cooking oil on a piece of toilet paper and wiped the table with the oil. After several minutes, the glue was completely wiped away! You can use oil to remove sticker price tags from brand new tumblers and containers too, it works the same, very effective!

Thursday, September 24, 2009

Simple And Wholesome Meals For Toddlers And The Amazing Thermos Shuttle Chef

I made a pot of delicious fish soup (ma yau toong fish meat and fish head) with tomatoes and ginger the other day. Baby loves soup and she drinks 2 bowls of soup every day. Drinking soup is one good way of making her drink fluids coz she dislikes water. She even dislikes drinking formula milk more and up until today, it is still a battle each time I spoonfeed her with formula milk 2-3 times a day.


This is Baby's bowl of Japanese green tea noodles with fish, veggie and fish soup.


Alycia and Sherilyn had chilled green tea noodles with cold Japanese green tea noodles sauce, shredded seaweed, some veggie and toasted sesame seeds and a bowl of fish soup each.


Our soup is normally boiled using a special Thermos pot on the stove. Once the soup is ready, the pot is transferred back to the Thermos Shuttler Chef where the soup will continue to cook and will be kept hot for more than 10 hours.

Sometimes when I need to go out early in the morning and don't have enough time to prepare soup or Baby's meal, I would boil the soup at night, then transfer the pot of hot soup into the Thermos Shuttler Chef. The following morning, I'll boil some noodles or pasta with veggie and fish. Then add in the hot soup and put Baby's lunch into a small Thermos flask before we go out.


The Thermos Shuttle Chef consists of a steel cooking pot that fits inside an insulated outer pot. You partially cook the food in the inner pot on a stovetop or camp fire, then place the inner pot into the outer pot and put the lid on. The outer pot has vacuum-insulated double walls so the food keeps cooking slowly in its own retained heat.

Because food only needs to be partially cooked before being transferred into the insulated container, the Shuttle Chef uses less energy than it would take to cook the same dish completely on the stove or in an electric slow cooker. You can leave the food to cook while you do other things, or even take the Shuttle Chef with you on a picnic to enjoy hot food al fresco.

Monday, April 20, 2009

Lola My Kitchen Helper

For someone who has sensitive skin and eczema, I can never touch dishwashing liquid. That's the reason why I only buy those that are gentle on hands and those that cost a little more. Though I have a maid, I still wash some of the dishes myself... can't leave everything to my maid. Moreover my maid often does slip-shod jobs and I always find food and soap residue on the bowls, plates and cups. Instead of nagging her everyday to wash thoroughly, I wash my kids' eating utensils myself.... with a dishwasher that comes with a handle. The first one that I had was a gift for me from my sil several years ago. She bought it from Europe. It's really handy and my hands don't have to be in contact with dishwashing liquid anymore. Yesterday I bought another one, called Lola :

Lola comes with a soap dispenser on the handle and can sit neatly at the corner of the counter top, above the sink...


You can also get re-fills for the sponge for Lola.